Tuesday, October 22, 2013

A Few Finished Quilts

Wednesday again! And I missed a few Wednesdays cause I was too busy sewing and kid-caring.

I finally finished the not-so-beautiful beauty called  Bear Grease! 
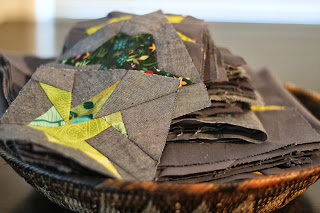
These Bear's Claw blocks came together when I was practicing half-square triangles and the fabric store didn't have anymore of the green chambray that I used. So I set them in a black and white chambray and I didn't really love it. So I pressed the top and put it away. Fast forward several months when I am ready to rent the long arm and I needed to quilt a top that I wasn't too attached to. The Bear's Paws were perfect. I could go to town FMQ on the long arm for the first time and I wasn't going to cry if it wasn't "perfect". 

It also happened that many things were happening in the weeks that I was finishing this quilt and my husband, who is the Bear medicine in our family, is always telling me to slap on some bear grease. In other words, stay protected and don't let it get to you. I sure needed bear grease this last month and so the cozy quilt Bear Grease was born.

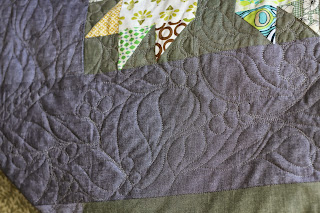
It was long armed on a Gammill that I rented at a LQS a couple hours from home. My husband wanted leaves and berries on the quilting because that is what bears eat. I was pretty surprised at how good the quilting looks for being my first time. And it is a sweet family quilt that now lives on the couch.

Bear Grease back
I also finished a sweet baby star quilt for close friends that had their baby boy last week.

Vincent's Star Quilt

I finally launched my Etsy store Chona Homegrown . I sold my first quilt last week and already have one commissioned for December. It's nice to feel my quilting is appreciated by others!

I finished up the scrap baby quilt I have been working on. I sample FMQ the whole thing and tried some new things like feathers in the border. Yes it was difficult at first. It was eventually possible. I just hope I keep getting better with practice.


And for the WIP that I am working on today...

I decided to jump in and do a Swoon quilt. I have four of the nine blocks done and I am still deciding if I will piece it as the full 85" square bed quilt or only five blocks on a bed quilt so that I can use four of them for big Swoon couch pillows cause they would look so good in the living room and the couch is in a sad state.


I got a couple more Heather Ross baby hexie quilts in the works for SF Art Market and my Etsy store.

I have been wanting to do a New York Beauty for many years so I finally started piecing the points with scraps. This one is going to be awhile.
And as always, there are a stack of Peace Cranes by the machine ready to be pieced into my first Peace Crane bed quilt. This one is a keeper for Mateo. Gotta be.

That's my quilt story today. Thanks for stopping by my sewing room!


Wednesday, September 25, 2013

What's Cooking Here?

Just as I was about to post this my husband stopped by the house and I was cleaning the living room and he asked me "what quilt are you basting?" because he knows that I usually only ever clean so that I can use the floor or space for quilting! We laughed a bunch about that just now. I figured you'd relate.

I free-motion quilted for the first time on the long arm and this is the result so far. I completely went into it without any attachment to the outcome and so far and I can't believe how nice it looks! Since its a bear's claw quilt, my husband suggested leaves and berries cause its what they eat. Really cool to learn to quilt on the long arm. I didn't finish which is a bummer to have to take it off the frame but I am going to do some walking foot quilting on the bear's claws themselves, then go back down and reload it upside own and go through the whole thing one more time to be done. How fun is quilting?!


 This is the result of the scrap busting I did last week. I ended up with 50 12 1/2 inch slabs and used most for this full size top. I used a cool green chambray for the sashing. (Thanks to a blog inspiration for this design, which I cannot now find- If you have an idea, pls lmk cause I'd love to credit) I think this one might get basted with wool batting and get given to my 20 year old who has chosen to rent out a basement for his room this winter!


 Another little top I made with some scrap slabs that I made last week.

And last but not least... I am having a Jackie Gering week! I took her hexie class a few weeks ago and this is the result of that class. A very cute hexie baby quilt with some Healther Ross prints which always melt me cause they're so cute.

 And a close up of the quilting that I did with the walking foot.
I also started doing Jackie's Craftsy class and ended up with this Love Knot top made with "stitch and flip" triangles. I guess now with these new tops I really need to get basting!

Thursday, September 19, 2013

Arts in the Schools!

I just got home from my fourth full day in the last two weeks teaching lower and upper elementary kids! Something I have not done for a very long time. And this time I get to bring my sewing machine! I was invited by the Arts Director to be a teaching artist this year for Moving Arts EspaƱola and La Tierra Charter School. I have known many amazing folks to have this honor over the years and now it is my turn! How cool is that?

I can't really post pics of all the kids cause their folks might not like that without permission but here are some pics of some of us and our piles of fabric that we played with. Each child is making a personal flag with cotton fabric and thread to represent who they are. What an amazing experience this has been so far. Thank you La Tierra Charter School!


 I brought some quilts in to show the kids. I showed them diamonds, squares, rectangles, half-square triangles, 60 degree triangles, and hexagons!


Miss Josphine, Seemstress and fellow school mom sewing away


My neighbor and her flag


My guy is on the far right - they're choosing their background colors


I will most definitely update with some flag finishes cause these kids and their flags are beautiful!

Wednesday, September 18, 2013

What's going on in this sewing room?

Phew. Wednesday. First off I have to show off the finished Morning Star Quilt for the La Tierra Charter School Raffle. This is my second FMQ and for this one I did all over swirls. I am getting the hang of it. My stitches are finally looking regular! It feels SO liberating to FMQ at home.

I rented the long arm at a LQS a few weeks ago for the first time and this is my practice piece.


 I am going back down to use the long arm next week to do the Bear Grease Quilt that has been waiting to be quilted for many many months and it is most certainly time.


Lots of things going on here in my corner of the world. I LOVE both the Material Obsession books and have done several quilts from them. Here is a 60 degree triangle quilt from the second book getting ready for piecing. The top and back are done and ready to be basted. I put my favorite grasshopper print on the back. Yummy cute for snuggling. :)


 I have made almost 40 peace cranes this week and did my first crazy pieced scrap crane for Mateo who of course loves it. Doing all these cranes this month really made my think a lot about old friends, hard work, and relentless prayers. No Nukes.


Here's what the floor looks like. SO much fun to play with scraps of fabric.

87 peace cranes sewn so far. When I'm sewing cranes I am thinking of the Hibakusha (survivors and decedents of survivors of Hiroshima and Nagasaki) and I think of my dear friend and mentor, Corbin Harney.  I also think about my dear big hearted husband. <3

A complete scrap bust happened here this week because of some rearranging that happened. Here's what the floor looked like for a while.

I ended up building over 50 12 1/2 slabs that are ready to be pieced with some solid sashing etc. Feels so good to use up all those little precious and not cheap pieces of fabric!


Last but not least is a celebratory photo of the birth room that we built. As a midwife a birth center is something I always wish we had in our community here like they have in Taos. Anyway- we don't have money to build a birth center right now but we all rallied together and renovated a room in the clinic of a local midwifery practice. It turned out so beautiful and I put morning star quilts on the wall and on the bed. I am so excited for mamas to use the space and so proud!


K. Well. That was my 20 minutes on-line today. Nice to see all your beautiful work out there. Please keep the inspiration coming. Happy quilting!

Friday, August 30, 2013

Finish it up Friday!

We we have a big grand opening at our clinic tomorrow and on top of that, last sunday Mateo and I got caught in the rain on the bike so I am very under the weather this week. I stayed home resting and of course, sewing!

I finished up the tutorial that I have been wanting to put together and finished up two Star quilts that I have been working on. The red and Blue one is for a raffle for the Doula program and the grey one I made for the tutorial so it might go to the school raffle in a few weeks. Here's a pic of the two together. Please see the tutorial if you would like to see the process pics.


I have one more WIP that I just didn't quite finish. This sweet Rainbow Morning Star quilt is only the second bed size quilt that I have free motion quilted at home! I'm so excited that I tried a new all-over pattern and it looks decent! It was getting dark but I still just had to update.


Anyway- so liberated by the idea that I can get good enough to FMQ  my own quilts. My new sewing set up helps so much with the clamps and the set-in machine. Well, off to sew the binding on this star then go over to the clinic and help get the birth room ready for our open house tomorrow!  Have a great weekend quilty folks!

Wednesday, August 28, 2013

My first tutorial! Strip Pieced Star Quilts


So this is my first tutorial so I hope that I put it together in a way that is helpful. I love making lone Star Quilts. I make them in all sizes, with extra diamonds, in solids and prints. I also make Lone Stars right out of my scrap bins. Those made from scrap strips come out the best because I have to work with the fabric that I have and I end up putting them together differently than if I had more fabric to choose from! I have several strip bundles that I sort for Lone Stars from the scrap bins!

The first thing you need to do is decide how big you want your Star to be. The size of the star itself is determined by two things: 1) The size of the strips you cut, and the number of diamonds in the star. For this tutorial, I cut 2 inch strips and I chose 11 colors. This Star will end up being about 43-44 inches point to point. The number of colors or fabrics has to be an odd number to create the diamond.

When you are preparing your strips you will need one strip of the first, two strips of the second, three strips of the third, four strips of the fourth, five strips of the fifth fabric, six of the center fabric and then decrease down by one from there so five strips of the seventh, four strips of the eighth fabric, three of the ninth, two of the tenth, and one of the eleventh. Here you can see that I have my strips laid out. Remember that the center fabric has the most strips but is not the center of the star. The center fabric (the one with the most strips) actually ends up to be the largest ring. The color/fabric with just one strip will be the point of your diamond making either the center or the points of the star, depending on how you piece it. That took me awhile to remember where the fabrics actually get placed.


Then the next thing that you will do is create six piles of strips starting the first through the sixth, then the second through the seventh, then the third through the eighth, then the fourth through the ninth, the fifth through the tenth and lastly the sixth through the eleventh.

Sew them together with 1/4" seam allowance.


Make sure to start the next strip slightly below the last one so it is staggered because you will be cutting at 45 degrees.

So you will end up with six strip sets. Mine looked like this.


Press each one very well because you don't get to press again until after you put the background fabric in the corners of the Star because of how delicate the bias cuts are on the diamonds. When you press, alternate directions on each set. So press towards the first fabric then the next press towards the last fabric and alternate that way so that your seams sit nicely.
 After you press these strips very well, it is time to cut again. You are going to cut at a 45 degree angle at two inch widths. You need to have at least eight because we are making an eight pointed star. When you cut you'll see that you will have more than eight. I just cut them all and save the extras for a scrappy star or binding later.


Then after you have cut all six strip sets at least into eight 2 inch 45 degree strips, then you are ready to pull one of each six strips to create your diamond.
 When you do sew the strips together to make the diamonds, you will have to be careful to allow for the 1/4 inch that it needs to line up the seams. So its hard to see in the pic but there is a quarter inch between the seams.
 It is much easier to do when the allowance happens to be pressed towards the seam you're matching up but that only happens some of the time.

 So here is what I ended up with- eight beautiful diamonds ready to complete a lone Star!
 My diamonds stacked at the machine ready to get assembled.
 When you put the diamonds together, you line up the seams exactly to each other.
 I will add more in a bit to finish explaining how I do the Y seams and cut the background squares and triangles. You can do this same process with 5, 7, 9, 11, or 13 (or any odd number) fabrics/colors. You can also cut your strips to be different widths that will change the size of the diamonds. But then when you go to cut the strip sets, you will cut them at 45 degrees at whatever width you chose. You can also email me at chonahomegrown@gmail.com if you have any questions.


Here is the completed top


And getting quilted

Close up of the quilting. It was the first time that I did an all-over pattern on a Star.

 The finished Quilt! It ended up measuring 45 inch square

 Just to show you how you can size your star- here's another I finished today that measures 43 1/2 inch square

And here is a pic with the two together so that you can see how the size is determined by the number and width of the diamonds. The grey star is 11 fabrics at 2 inch widths and the red and blue star is 7 fabrics cut at 2 1/2 inch widths but they are similar in size.

For another example of sizing- this star was done with 7 fabrics and cut at 1 1/2 inch widths and ended up being a 23 in square